Well, i got a lots of requests in the past few months about a simple CoGe effect, which should allow to do some basic 3D transformations, you know rotate, resize, move, so maybe the most common things. Also got some requests for a kind of Quartz Composer tutorial, for something easy to do, so now i'll show you how it can be done in Quartz Composer, in a series of tutorials, let me call it parts - there will 3 or more. At the end of each parts, i'll publish the actual Quartz Composer file.
However, a basic understanding of Quartz Composer is requires, if you don't own that basic knowledge, don't worry: Quartz Composer is an easy to learn stuff. If you are a beginner, you definitely should look into Apple's Quartz Composer User Guide, its a very good starting point. You can also find a lots of tutorial videos about Quartz Composer in Youtube and Vimeo.
Let's get started. Today we will create the rotation thing and the connection between Quartz Composer and CoGe.
1. Figure out what we will need
Well, we need to move, rotate and resize our image. This shouldn't be hard with Quartz Composer. We also need to use it as a CoGe FX. Hmm. There are 2 patches in Quartz Composer could do this simple steps, the Billboard and the Sprite. The Sprite it seems to be the better choice, because it renders a 3D "plane", so it has X-Y-Z rotation values till Billboard only has one rotation parameter. Okay, the Sprite just won, keep it going.
2. Build it up with Quartz Composer! Start Quartz Composer and drop a Clear patch to the editor, it is necessary to clear the screen before perform any drawing, or on the CoGe side we will see some unwanted glitches. Now drop a Sprite patch to the editor from the Library. You will see a white box appears on the viewer - yay, we Quartz Compose just rendered a frame!
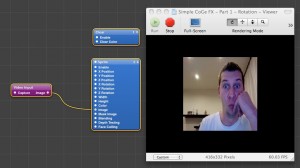
We are happy with that white "box", but i prefer using my webcam's input while developing compositions, so drop a Video Input patch to the editor, and connect the Image output of the patch to the Sprite's Image input. Yay, now you see yourself on the Viewer, freaky thing, isn't it? :)
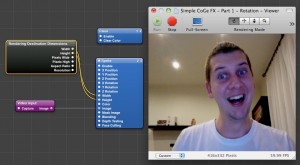
This is good, but the problem is the image showing on the viewer has not the correct aspect ratio and a little bit little - we need to stretch it, and force to use the entire canvas. To do that, we should let our Sprite to know the dimension of the canvas. An other Quartz Composer patch will help us, with the name Rendering Destination Dimensions. This patch gives us the width and height of the canvas, so connect to Width and Height outputs of this patch to the *Width and Height inputs of our Sprite. *Much better know, isn't it !?
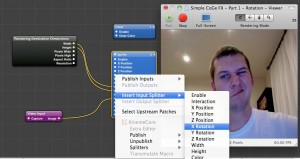
So, let's do the rotation job. Our Sprite owns that rotation inputs we need, so we need to publish them as better usable controls and usable controls outside of Quartz Composer as well! To do that, first we will add Input Splitters for each of them - you will see in the next step why don't just simple publish them - by right-clicking on the Rotation labels on our Sprite and select the proper item's from the Insert Input Splitter submenu, one bye one.
If you finished with those steps, you will see something like in the image, except me on the screen. Fortunately. :) Now do a right-click on each splitters, select Input from Publish Input submenu, and give each a proper name, like X Position an so on.
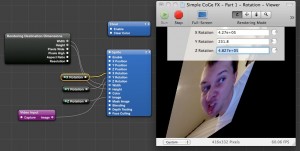
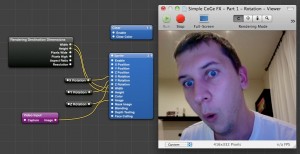
To see what we did do, hit CMD+T - this will show a panel on the Viewer with some controls for each of the items we just published. We can change the rotation degrees by typing onto the fields or by rotating the circular sliders, but we are still able to give a useless big degree amount, which is not a practical thing and won't work in CoGe well, so we need to limit this values, i guess.
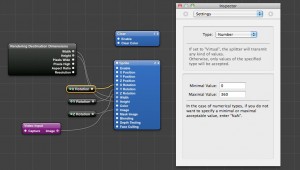
Select an input splitter, click on Patch Inspector, then go to the Settings of the patch and define the minimum and maximum values by typing the needed values to the fields. That's it, we are going to be super-awesome! Now if we going back to our viewer, we will find now we got "normal" slider with a limited value range, suppa' ! Only one step left to make this thing CoGe compatible: remove the Video Input patch - good bye funny faces, ahh, so sad... - and then publish as input splitter for the Image input of the Sprite, - as we did in the previous step with rotation inputs - and publish it with the name inputImage. The inputImage is a tricky publish name, because it will be the connection point between CoGe and Quartz Composer. When CoGe will found this, it will do the following:
Yo man, inputImage parameter? I'll feed it with with the current frame, let the pixels data flowin', let the pixels data flowin'...
So, save the composition into a folder - create a new maybe, or use Basic - inside CoGe/modules/effect. The name of the folder you just saved into will be the category name in CoGe. Yay, one more thing! Reset the values to 0 before save, because this value will be the default when you open it next time in Quartz Composer, or in CoGe!
Okay, now launch CoGe, create a layer, and apply our just created effect on it. That's all for know, thanks for reading this article and using CoGe. :) As always, have fun!
Next time, we will add the positioning feature for our CoGe FX, so see you soon! Please feel free to comment and ask any question's about it!